Battery switch on travel trailer function is crucial for managing your RV’s power. Understanding how your battery switch works – whether it’s a single, dual, or more complex system – is key to preventing dead batteries and ensuring you have power when you need it. This guide breaks down the types of switches, their functionalities, troubleshooting tips, installation, maintenance, and important safety considerations to keep your travel trailer running smoothly.
We’ll cover everything from basic switch operation to integrating alternative power sources like solar panels and generators. By the end, you’ll be confident in managing your travel trailer’s electrical system and avoiding common problems.
Battery Switch Types in Travel Trailers
Choosing the right battery switch for your travel trailer is crucial for managing your power sources efficiently and safely. This involves understanding the different types available and their respective pros and cons. Let’s dive into the details of the most common battery switch options.
Single-Battery Switches
Single-battery switches are the simplest type, designed for travel trailers with only one battery. They’re essentially on/off switches, providing a way to disconnect the battery from the trailer’s electrical system. This is important for preventing parasitic drain when the trailer isn’t in use. They’re easy to install and inexpensive, making them a good choice for basic setups.
Dual-Battery Switches
Dual-battery switches manage two batteries, typically a house battery and a starting battery. These switches allow you to isolate each battery independently or connect them together. This setup offers flexibility; you can run your house appliances off one battery while keeping the starting battery charged for your tow vehicle. They are more complex than single-battery switches but offer greater control over your power.
Battery Isolators
Unlike switches that manually disconnect batteries, battery isolators automatically manage the charging and discharging of multiple batteries. They allow the alternator to charge both batteries simultaneously while driving, preventing one battery from draining the other. This is a convenient and efficient way to maintain your batteries’ charge, especially for longer trips. Several types of isolators exist, including diode isolators and smart isolators offering different levels of charging efficiency and protection.
Comparison of Battery Switch Types
| Feature | Single-Battery Switch | Dual-Battery Switch | Battery Isolator |
|---|---|---|---|
| Number of Batteries Supported | One | Two | Two or More |
| Operation | Manual On/Off | Manual, multiple positions (e.g., both, one, or neither connected) | Automatic |
| Installation Complexity | Low | Medium | Medium to High (depending on type) |
| Cost | Low | Medium | Medium to High |
| Maintenance | Low | Low | Low (may require periodic cleaning of connections) |
| Charging Efficiency | N/A | Dependent on manual switching | High (especially smart isolators) |
Understanding Battery Switch Functionality

A battery switch in your travel trailer acts as the central control for your power sources, allowing you to seamlessly switch between different power sources and manage your battery power effectively. It’s a crucial component for preventing accidental drain and ensuring your batteries last as long as possible. Understanding its operation is key to maximizing your off-grid capabilities and avoiding costly repairs.The primary role of a battery switch is to direct the flow of electricity.
This means it controls which power source (shore power, generator, or battery bank) supplies power to your trailer’s appliances and systems. It also allows you to isolate individual battery banks (if you have multiple) or disconnect them completely to prevent parasitic drain when not in use. This prevents your batteries from slowly discharging over time when the trailer is stored, for example.
Switching Between Power Sources
The process of switching between power sources depends on the type of battery switch installed in your trailer. A simple on/off switch simply connects or disconnects your house batteries from the trailer’s electrical system. More sophisticated switches allow for selection of various combinations of battery banks and shore power. For example, a switch might have positions for “Off,” “Battery 1,” “Battery 2,” “Both Batteries,” and “Shore Power.” Moving the switch to “Both Batteries” connects both battery banks to the trailer’s system, while selecting “Shore Power” disconnects the batteries and powers the trailer solely from external power.
Always consult your trailer’s manual for the specific operation instructions of your switch. Incorrect operation could lead to electrical damage.
Battery Drain Protection and Optimal Power Usage
A correctly used battery switch is essential for preventing battery drain. By isolating batteries when not needed, it prevents small continuous draws (parasitic loads) from slowly depleting your batteries. These small draws, from things like clocks or smoke detectors, might seem insignificant individually, but they can add up over time, leaving you with dead batteries when you need them most.
Furthermore, selecting the appropriate power source (shore power when available) reduces the load on your batteries, extending their lifespan and reducing the frequency of charging. A well-maintained battery switch, coupled with good battery care, is vital for long-term reliability and cost savings. For example, leaving the batteries connected when shore power is available can lead to premature battery wear, while accidentally leaving the batteries connected when not in use can leave you with a dead battery when you need it to power your lights or appliances.
Troubleshooting Common Battery Switch Issues: Battery Switch On Travel Trailer Function
Dealing with a temperamental battery switch in your travel trailer can be frustrating, but with a systematic approach, you can often pinpoint and resolve the problem. Understanding the common causes of battery switch malfunctions will help you diagnose and fix the issue efficiently and safely.Common problems usually stem from a few key areas: faulty wiring, corroded connections, or a failing switch itself.
These issues can lead to anything from a complete lack of power to intermittent operation, making your camping experience less enjoyable. Let’s look at how to troubleshoot these issues effectively.
Identifying Faulty Wiring
Faulty wiring is a frequent culprit behind battery switch problems. Damaged wires, loose connections, or improperly installed wiring can all disrupt the flow of electricity. Visual inspection is the first step. Carefully examine all wires leading to and from the battery switch, looking for any signs of fraying, melting, or discoloration. Pay close attention to the connections; loose or corroded terminals are common points of failure.
A multimeter can be used to check for continuity in the wiring, ensuring a complete circuit. If you find a break in the wire, it will need to be repaired or replaced. Always disconnect the battery’s negative terminal before working on any wiring to prevent accidental shocks.
So, you’re hitting the road in your travel trailer? Awesome! First things first: learn how that battery switch works. Check out this guide on the battery switch on travel trailer function to avoid any dead-battery surprises. Once you’ve got the power sorted, it’s time to think about entertainment. If you’re an audiophile, setting up your sound system on the go is key; a good audiophile travel setup can make all the difference in enjoying your trip’s soundtrack.
Get those details right, and your adventure will be smooth sailing (or driving!).
Diagnosing Corroded Connections
Corrosion is another major source of problems. Battery terminals and switch connections are particularly vulnerable. Corrosion builds up over time, creating a resistance that impedes the flow of electricity. A visual inspection will often reveal a white, green, or bluish powdery substance on the terminals or connections. Cleaning these connections is crucial.
Use a wire brush or terminal cleaner to remove the corrosion. Apply a corrosion inhibitor to help prevent future corrosion. After cleaning, securely tighten all connections. A visual inspection, along with a voltage test, will reveal if this addresses the issue. If the voltage drop across the corroded connection was significant, you’ll see a considerable improvement after cleaning.
Assessing Battery Switch Failure
Sometimes, the problem lies with the battery switch itself. While less common than wiring or connection issues, a faulty switch can cause intermittent or complete power loss. If the wiring and connections are all sound, the switch may be the problem. Testing the switch requires a multimeter. With the switch in the “on” position, measure the voltage across the terminals.
If the voltage is significantly lower than expected, or if there is no voltage at all, the switch is likely faulty and will need replacement. Remember to always disconnect the negative battery terminal before performing any tests or replacements.
Safe Practices for Electrical System Work
Working with the electrical system in your travel trailer requires caution. Always disconnect the negative battery terminal before starting any work. This prevents accidental shocks and short circuits. Use insulated tools to avoid contact with live wires. If you’re unsure about any aspect of the repair, consult a qualified RV technician.
Working with electricity can be dangerous; safety should always be your top priority.
Battery Switch Installation and Wiring Diagrams
Installing a battery switch in your travel trailer is a straightforward process that significantly improves your electrical system’s management and safety. This section details the wiring diagram for a common dual-battery setup and provides step-by-step instructions for installation. Remember, working with electricity requires caution; always disconnect the battery negative terminals before beginning any work.Proper installation ensures reliable power distribution and protects your investment.
A correctly wired system prevents accidental drain on your house battery and allows you to isolate batteries for maintenance or repair. This section provides a clear understanding of the process, from preparing the components to final testing.
So, you’re getting ready for a road trip in your travel trailer? Awesome! First things first: learn how to use that battery switch. Check out this guide on the battery switch on travel trailer function to avoid any dead-battery surprises. Once you’ve got the power sorted, it’s time to think about entertainment. For those with discerning ears, setting up an audiophile travel aetup is key for enjoying your favorite tunes on the road.
It’s all about maximizing your adventure, right?
Dual-Battery Wiring Diagram
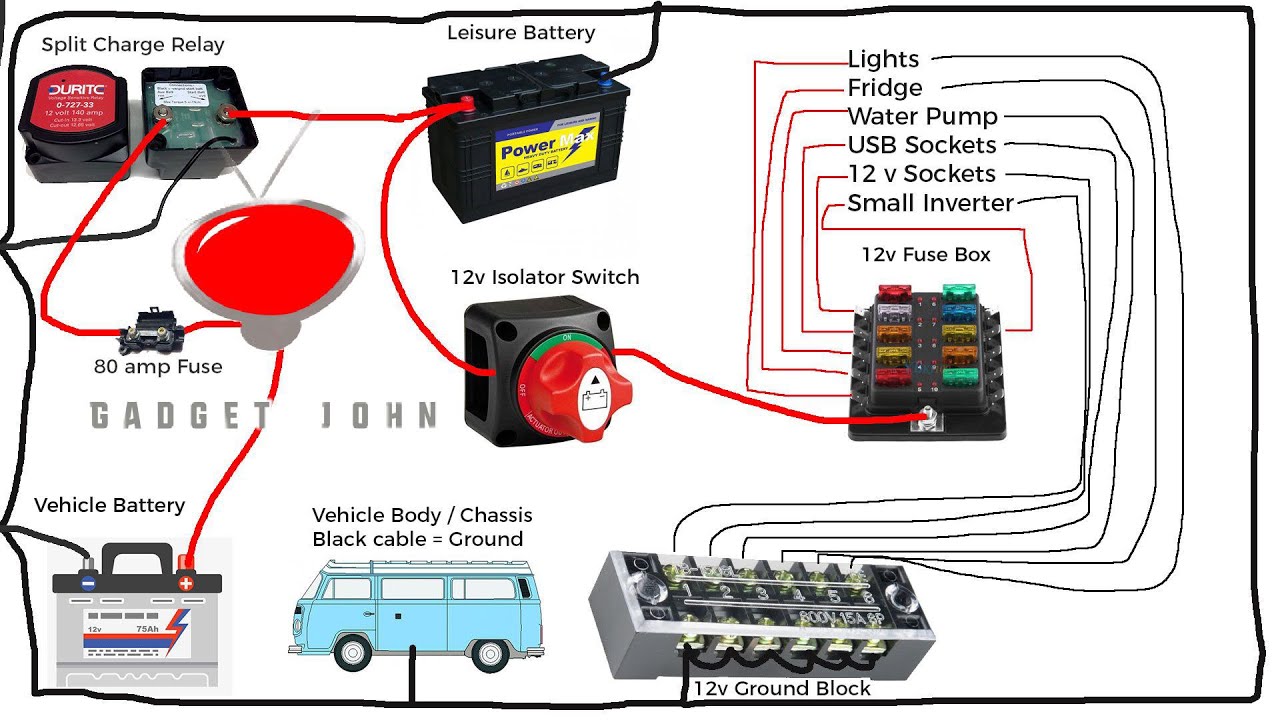
The following diagram illustrates a typical dual-battery setup with a battery switch. This setup uses a battery switch to isolate the two batteries (typically a house battery and a starting battery) from each other and from the trailer’s electrical system.Imagine a simple rectangle representing the battery switch. From the top of the rectangle, two thick lines extend, each labeled “Battery 1” and “Battery 2” respectively, these lines represent the positive (+) terminals of your two batteries.
At the bottom of the rectangle, there are three outgoing lines: one labeled “House Load,” representing the power going to your trailer’s 12V system; one labeled “Start Load,” providing power to your truck or tow vehicle’s starting system (if applicable); and one labeled “Charging System,” connected to your converter/charger. Each of these three lines connects to a separate bus bar or distribution point for easier connection to your trailer’s various electrical components.
The negative (-) terminals of both batteries are connected directly to the trailer’s chassis ground, creating a complete circuit. Remember, all connections should be secure and corrosion-resistant.
Battery Switch Installation Steps
Before starting, gather your necessary tools: wire strippers, crimpers, wire connectors, a wrench (size appropriate for your battery terminals), a screwdriver (if the switch requires mounting screws), and safety glasses.
- Disconnect Battery Terminals: Always disconnect the negative (-) terminals of both batteries before beginning any work. This prevents accidental short circuits and protects you from electrical shock.
- Mount the Battery Switch: Securely mount the battery switch in a convenient, accessible, and well-ventilated location within your travel trailer. Ensure the location is protected from moisture and extreme temperatures.
- Connect the Batteries: Using appropriately sized and insulated wires, connect the positive (+) terminal of each battery to the corresponding terminal on the battery switch. Use ring terminals for secure connections to the battery posts.
- Connect the Loads: Connect the “House Load,” “Start Load” (if applicable), and “Charging System” terminals of the battery switch to their respective bus bars or distribution points using appropriately sized and insulated wires. Ensure that the wire gauges are sufficient to handle the current demands of each circuit.
- Ground the System: Connect the negative (-) terminals of both batteries directly to the trailer’s chassis ground using heavy-gauge wire. Ensure the ground connection is clean and secure.
- Reconnect Battery Terminals: Reconnect the negative (-) terminals to the batteries.
- Test the System: Test the system by turning the battery switch to different positions to ensure that power is correctly routed to the various loads. Verify that the starting and house batteries are isolated from each other when the switch is in the “off” position.
Proper Connection of Components
Properly connecting the battery switch to the batteries, charging system, and trailer components is crucial for optimal functionality and safety. Use appropriately sized and insulated wires for each connection, paying close attention to polarity. Incorrect polarity can damage components and create a fire hazard. Always double-check your connections before reconnecting the battery terminals. Crimp-on connectors should be used to ensure secure and reliable connections.
Use heat-shrink tubing or electrical tape to protect exposed wires and prevent short circuits. Never use damaged or frayed wires. The charging system should be connected to the battery switch so that it can charge both batteries simultaneously when the switch is in the “on” position. The house load and start load should be clearly identified and connected to the appropriate terminals on the battery switch to ensure proper power distribution to the various components of your trailer.
Maintaining Your Travel Trailer’s Battery Switch
Keeping your travel trailer’s battery switch in top condition is crucial for reliable power and preventing costly repairs. A well-maintained switch ensures safe and efficient operation of your trailer’s electrical system, protecting your batteries and other components from damage. Regular cleaning and inspection are key to extending its lifespan and avoiding unexpected power outages on your adventures.Regular maintenance of your travel trailer’s battery switch is simple but vital for its longevity and the reliable operation of your electrical system.
Neglecting this can lead to corrosion, poor connections, and ultimately, system failure. By following a consistent schedule, you can significantly reduce the risk of problems and enjoy worry-free power throughout your travels.
Battery Switch Maintenance Schedule
A proactive approach to maintenance is best. The following schedule Artikels tasks and their recommended frequency. Adjust this schedule based on your usage and environmental conditions (e.g., coastal areas with high humidity may require more frequent cleaning).
- Monthly Inspection: Visually inspect the switch for any signs of corrosion, loose connections, or damage to the wiring. Check for any unusual smells or overheating.
- Quarterly Cleaning: Use a wire brush or a battery terminal cleaner to remove any corrosion build-up from the switch terminals and connections. Apply a corrosion inhibitor, such as dielectric grease, to the terminals after cleaning to prevent future corrosion.
- Annual Thorough Inspection: Perform a more detailed inspection, checking all wiring connections for tightness and signs of wear. Tighten any loose connections and replace any damaged wiring. Consider having a qualified technician inspect the switch and its wiring if you are unsure about any aspect of the inspection.
Preventing Corrosion and Ensuring Optimal Performance
Corrosion is the enemy of any electrical connection, and your battery switch is no exception. Preventing corrosion is key to maintaining optimal performance. Moisture and salt are primary culprits.
- Keep it Dry: Protect the battery switch from moisture as much as possible. Consider using a waterproof cover or sealant if it’s exposed to the elements.
- Use Dielectric Grease: Applying a thin layer of dielectric grease to the switch terminals and connections after cleaning creates a barrier against moisture and prevents corrosion.
- Proper Ventilation: Ensure good airflow around the battery and switch to help prevent moisture build-up.
- Clean Regularly: Regular cleaning, as Artikeld in the maintenance schedule, is the most effective way to prevent corrosion from taking hold.
Battery Switch Maintenance Checklist
This checklist summarizes the key maintenance tasks and their frequency. Use it as a guide to ensure your battery switch remains in optimal condition.
- Monthly: Visual inspection for corrosion, loose connections, damage, unusual smells, or overheating.
- Quarterly: Clean terminals and connections with a wire brush or terminal cleaner; apply dielectric grease.
- Annually: Thorough inspection of all wiring; tighten loose connections; replace damaged wiring; consider professional inspection if needed.
Battery Switch and Alternative Power Sources
Your travel trailer’s battery switch plays a crucial role in managing power, especially when you’re using alternative sources like solar panels or a generator. Understanding how these systems interact ensures efficient power management and prevents potential problems. This section details how your battery switch works with these additional power sources.The battery switch acts as a central control point, directing power flow from various sources to your trailer’s battery bank and subsequently to your appliances.
When your generator is running, it typically charges your batteries through a dedicated charging circuit. The battery switch allows you to connect or disconnect the batteries from this charging circuit as needed. Similarly, solar panels charge the batteries independently; the battery switch ensures that this charging process isn’t interrupted by other power sources or loads. The switch’s role is primarily to isolate or connect your house batteries to the various power sources and the trailer’s electrical system, preventing feedback loops and short circuits.
Power Distribution from Multiple Sources, Battery switch on travel trailer function
The battery switch facilitates a controlled distribution of power from your generator, solar panels, and shore power (if connected). It allows you to prioritize charging from one source while selectively using power from others. For instance, you could charge your batteries using the generator while simultaneously running appliances off the batteries. Alternatively, you might prioritize solar charging during the day and switch to generator power at night.
Proper use of the battery switch prevents overcharging and ensures that your batteries are properly maintained. Without a well-managed system, you could risk damaging your batteries or experiencing power surges.
Diagram of System Integration
The following diagram illustrates how a battery switch integrates with solar panels and a generator. Note that this is a simplified representation and actual wiring may vary depending on your specific setup.
| Component | Description | Connection to Battery Switch | Notes |
|---|---|---|---|
| Solar Panels | Convert sunlight into DC electricity. | Connected to a charge controller, then to the battery switch’s input. | Charge controller regulates voltage and prevents overcharging. |
| Generator | Provides AC power, converted to DC for battery charging. | Connected to a converter/charger, then to the battery switch’s input. | Converter/charger converts AC to DC and regulates charging. |
| Battery Switch | Controls power flow to and from the batteries. | Connects solar panels, generator, and house batteries. | Typically has multiple positions for isolating or connecting different components. |
| House Batteries | Store power for use by appliances. | Connected to the battery switch’s output. | Provides power to the trailer’s 12V system. |
Mastering your travel trailer’s battery switch is a vital skill for any RVer. From choosing the right switch for your needs to performing regular maintenance, understanding this system ensures reliable power and prevents costly repairs. By following the safety guidelines and troubleshooting steps Artikeld here, you can confidently manage your trailer’s power and enjoy worry-free adventures. Remember to always prioritize safety when working with electrical systems.
FAQ Corner
What happens if my battery switch is faulty?
A faulty switch can lead to power loss, battery drain, or even damage to your electrical system. Symptoms might include dim lights, non-functioning appliances, or a completely dead battery.
How often should I clean my battery switch terminals?
Inspect and clean your battery switch terminals at least twice a year, or more frequently if you live in a humid climate. Corrosion can significantly impact performance.
Can I install a battery switch myself?
While possible, installing a battery switch requires electrical knowledge and caution. If you’re unsure, it’s best to consult a professional RV technician.
What type of battery switch is best for my travel trailer?
The best type depends on your setup. A single battery switch is sufficient for a single battery, while a dual battery switch is ideal for managing two batteries and maximizing power. Consider your power needs and budget when choosing.
